The GCI’s Histology
Innovation Platform
A detail-oriented, cost effective
platform designed to meet all your
histology needs
Under the guidance of our pathologist Dr. Marie-Christine Guiot (MD), our trained histology technicians provide the highest standard histotechnology services to users throughout the McGill and Academic communities and the private sector. Under strict quality control surveillance, your samples are processed quickly.
Our Platform is equipped to provide general histological services, including sectioning, and specialized services including IHC staining, customized specialty stains, TMA’s and digital pathology solutions.
Our mission is to provide high quality services in an efficient and cost-effective manner to further your scientific research. Your satisfaction is our sincerest aim.
Director: Dr. Katie Cockburn
Co-Director and Pathologist: Dr. Marie-Christine Guiot
Platform Manager: Nicole Robinson MSc.
Senior Research Technician: Plinio Queiroz Da Cruz BSc.
Research Technician: Joy Zhang BSc.
Our Services
The Histology Platform is designed to help facilitate histology services on a wide breadth of tissues, cells and organoids from mammals, plants, insects, and fish. Our services span Routine Histology work (including paraffin processing, embedding, sectioning and H&E staining) to more complex services.
Services include:
- The biological preparation of tissues and cells for processing, embedding, and sectioning, for both paraffin and frozen samples.
- Staining of biological samples, including Immunohistochemistry and specialty stains.
- Design and construction of Tissue Micro Arrays (TMA).
- Digital Pathology: Digitizing slides for efficient storage and analysis.
- Training on histological techniques.
- Access to instruments that can be booked.
- Project consultation and optimization.
Paraffin Specimens
The Histology Platform offers a wide array of paraffin services to best suit diverse needs. The process of paraffinization is used to dehydrate tissues and cells before infiltrating the specimen with paraffin and further embedding the samples in paraffin.
Formalin Fixed Paraffin Embedded (FFPE) samples offer a lot of stability when sectioned and are an ideal way to store specimens’ long term. Not all stains are compatible with FFPE specimens, it is recommended to check with staff or consult the website to confirm your stain of interest is compatible.
Decalcification
Decalcification is commonly used for bone samples. After fixation bone samples undergo decalcification, which will remove minerals from the bone, helping to improve the quality of the bone sections.
If your study involves the need for assessing bone mineralization, this technique may not be right for you.
Paraffin Processing
Processing is essential for FFPE, ensuring that samples are suitable for sectioning. There are three phases to processing: 1) dehydration of the sample with EtOH, 2) clearing of the sample with xylene and 3) infiltration of the samples with paraffin wax. Once samples are infiltrated with paraffin they harden, allowing them to be sectioned with a microtome. Processing samples ensures the preservation of tissue architecture.
If your samples contain plastics or microplastics that need to be preserved, an alternative method of processing should be used. Please let the Core technicians know when submitting your samples if this is the case, so we can prepare them accordingly.
Paraffin Embedding
Paraffin embedding occurs after processing. This step generates tissue blocks, where processed tissue or cells are placed into the correct orientation for sectioning and surrounded by solidified paraffin. Paraffin blocks are then able to be sectioned. Paraffin embedded samples are excellent for long term storage or archival material.
Paraffin Sectioning
Paraffin sections are collected using a microtome. Blocks are first trimmed to expose the tissue or area of interest, subsequently sections, at a range of thickness are taken and placed into a water bath to smooth and relax, before being collected onto slides. Slides will be dried overnight at 37 degrees Celsius, allowing for proper adhesion onto the slide.
Different types of sections can be taken. Unstained serial sections are sequential sections, STEP sections are taken with a certain distance in between each section and scroll sectioning can be done to perform DNA or RNA extraction.
Scroll Sectioning
Scroll sections can be collected from the cryostat and used for DNA or RNA extraction. Scroll sections are collected into sterile tubes and can be taken in RNA free conditions.
Frozen Specimens
The Histology Platform is equipped to work with frozen specimens, whether they are fresh-frozen or have under-gone fixation and cryoprotection. Samples can be received to be embedded by Core staff or can be pre-embedded before submission.
Frozen samples will maintain lipid structure and allow for the preservation of DNA/RNA and certain epitopes. After OCT embedding, samples must be stored at -80 degrees Celsius.
OCT Embedding
OCT embedding can be used to generate blocks for any type of frozen specimen (either fresh-frozen or fixed and cryoprotected). When generating OCT specimen blocks staff carefully embed samples in your desired orientation and minimize bubbles, thereby ensuring quality sections.
Frozen Sectioning
Frozen sections are collected onto slides using a cryostat. Frozen blocks are first trimmed to expose the area of interest and immediately sections are collected. Specimens from different biological sources can be sectioned, UV disinfection is performed after each use to ensure there is no contamination from different samples.
Different types of sections can be taken. Unstained serial sections are sequential sections or STEP sections are taken with a certain distance in between each section.
Scroll Sectioning
Scroll sections can be collected from the cryostat and used for DNA or RNA extraction. Scroll sections are collected into sterile tubes and can be taken in RNA free conditions.
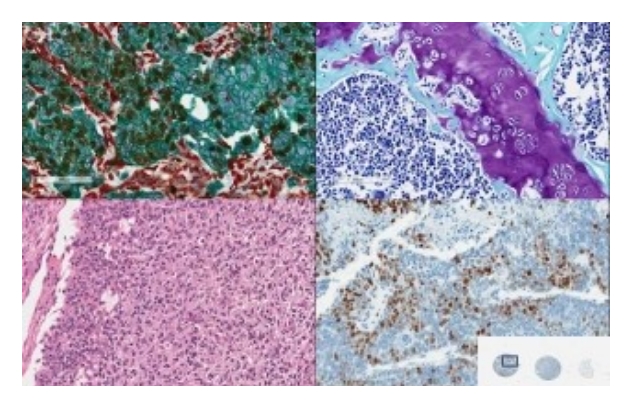
Histological Staining
Histological staining are techniques designed to highlight cellular or tissue features. There are many different stains one can choose from to accentuate areas of interest and provide a more in-depth knowledge of specific cellular or tissue structures. Staining can be used to diagnosis pathologies or help assess tissue changes between experimental conditions.
By far the most common stain used is the Hematoxylin & Eosin Stain or H&E. H&E stains are valuable tools to assess tissue anatomy and are often used in the initial assessment by pathologists.
Please click here for an overview of some of the most common Histological stains, when they would be used, what information they provide. Other specialty stains not listed can be developed with the help of our research technicians. Please contact the Core to discuss developing your desired stain.
Immunohistochemistry (IHC)
The Histology Platform is equipped to design and perform IHC, Immunofluorescence, and In Situ Hybridization experiments and antigen retrieval using the Ventana Discovery Ultra System. Below is more information on IHC and the Ventana Discovery Ultra System, as well as information regarding performing IHC experiments with the Platform and a list of protein markers the core has developed IHC protocols for.
Immunohistochemistry Overview
Immunohistochemistry is used in the detection of specific protein markers within tissues or cells. IHC is a staining technique that uses antibodies to bind to protein markers, showing whether their proteins are present within the tissue and allowing one to quantify protein levels.
IHC is an important diagnostic tool in the clinical setting, where it is often used to assess levels of hallmark biomarkers in tissues. Uses in the clinical setting can help with diagnosing a condition, determining prognosis, predicting how a patient will respond to treatment or monitoring the treatment response of a patient.
Another common application of IHC staining is in drug discovery. Using IHC one can ensure their potential drugs are influencing the appropriate targets and which conditions or subtypes of conditions a drug might be best suited to treat. Additionally, IHC can be used on any species if the antibodies are appropriately reactive with said species. Meaning one can test their influence on both the animal models they are working with and patient samples.
How Immunohistochemistry Works
IHC involves many different steps, each step is important for being able to visualize protein levels. Below is a workflow of the common steps in IHC staining and their purpose:
- Antigen retrieval: The preparation of samples for IHC (such as tissue fixation) can mask antigens and restrict antibody binding. Antigen retrieval allows antibodies to access antigens within the tissue.
- Permeabilization: Depending on where the antigen is found, antibodies may need to access regions inside the cell. Permeabilization is the step that facilitate this access inside the cell.
- Blocking: This step helps reduce background signals.
- Primary Antibody: The antibody will bind to the antigen.
- Secondary Antibody: The antibody will bind to the primary antibody. An enzyme commonly used in detection is horseradish peroxidase (HRP), this enzyme is linked to the secondary antibody.
- Chromogen: The chromogen will allow the secondary antibody- and thus the antigen of interest to be visualized. Commonly the chromogen used is DAB, turning the areas containing the antigen brown.
- Counter Stain: The tissues are often counterstained with hematoxylin, turning the background a blue colour. This provides contrast and makes visualization of the chromogen easier.
Benefits to using the Roche Ventana Discovery Ultra
The Histology Platform is equipped with a Roche Ventana Discovery Ultra, a fully automatic IHC stainer. There are many benefits of automated IHC staining and the Ventana Discovery Ultra System:
- High Throughput: 30 slides can be run simultaneously in the Ventana. Each of these 30 slides can be stained with the same antibody, or each lane can be stained with a unique protocol, all with limited intervention. Additionally, the machine can be run overnight to increase the throughput. These features increase protocol optimization speed and staining efficiently.
- Efficient Use of Time: The automation of the IHC staining can increase the efficiency of your work. The Ventana can stain slides in a timely matter with reduced manual intervention, saving one time. Since one can reliably expect results from the Ventana it allows the research to better organize their experiments.
- Decreased Variability and Reproducibility: 30 slides can be run within the same batch. Since the process is automated batch to batch variability is dramatically decreased. Additionally, Core staff will include optimized tissue controls to ensure that experiments are working properly. IHC staining involves maintaining different and specific set temperatures depending on the steps, which are automatically maintained within the Ventana, leaving less fluctuations that could impact results.
- Staining Customization: One of the key benefits of the Discovery Ultra system is the continuous ability to create, adapt and update protocols. Each step of the experiment can be altered to obtain the best results. When developing a new protocol or assay, many varying conditions can be tested at once to determine the optimal conditions.
- Other Time Saving Features: The Ventana also allows researchers to perform tissue baking, deparaffinization and antigen retrieval automatically. These first steps of IHC, IF and other assays are time consuming and require efficient temperature control. The Ventana can take part of the work off your plate and provides tissues that have undergone identical and high-quality antigen retrieval.
Performing Immunohistochemistry at the Histology Platform
The Histology Platform has many protocols developed for staining with different antibodies. Attached you will find a list of proteins that protocols have already been developed for, and if applicable, which maker or the name of the antibody preferred. While this list is extensive, the protein you wish to study may not yet have a protocol developed. If this is the case, please contact us regarding IHC Protocol Development.
Protocol Development for IHC involves collaboration between you, the Core, and our Pathologist. If you have an antibody you would like to use in IHC staining, contact the Core with the antibody data sheet. Please let us know which tissue you are working with and a little about your project and expected results. The Core will consult with our Pathologist to come up with ideal test conditions to test the protocol on control tissue samples. Once stained with IHC, digital copies of the scans will be sent to our Pathologist to verify appropriate staining. If staining is approved, we will move onto your samples. If staining is not approved, we go back to the drawing board and start with another round of optimization. Protocol development will only occur once per antibody, once a protocol is developed, it is saved by the Core to be used in the future.
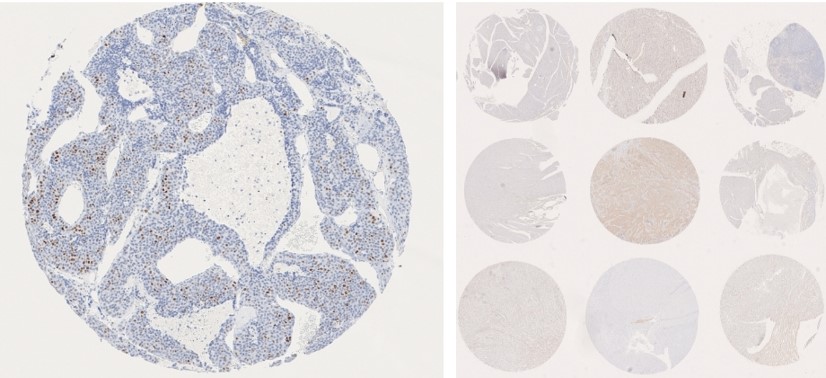
Tissue Microarray (TMA)
Tissue Microarrays (TMA) allow high throughput molecular analysis of vast number of tissues. TMAs are generated by taking small cores from paraffin embedded cells or tissues, and placing them into a recipient paraffin block, based on your configuration. The TMA recipient block can contain upwards of 550 cores, allowing one to study all these tissue specimens at once.
Benefits of Generating a TMA
There are many advantages that come with using TMAs.
- Efficient use of Tissue: Tissue cores, with a diameter of only 0.6mm can be collected from tissue specimens. This helps to limit the tissue being used, which is exceedingly important for rare tissues or biopsies. Instead of a whole tissue section being trimmed and taken each time, a small core of tissue is removed for the TMA, leaving the remaining tissue for further sectioning or to be used in subsequent TMA generation.
- Can be used on archival specimens: Tissue used in for TMAs is embedded within paraffin, which is ideal for long term storage. This means TMAs can be generated with archival blocks, limiting the tissue used from these specimens.
- Tissue cores can be taken from any area of interest within the tissue: Before the TMA is generated a section of the tissue can be taken and stained with H&E. The H&E slide helps one find the area of interest, that can be marked on the tissue allowing for efficient collection during TMA generation.
- Simultaneous analysis: All tissues of the TMA can fit on a single microscope slide allowing for uniform analysis. This removes any batch differences between stains and allows the most accurate comparison of the tissue.
- Cost efficient: Simultaneous analysis of multiple specimens allows up to 550 different samples to be sectioned, stained, and imaged at once. This is particularly valuable for costly specialty stains, IHC’s, immunofluorescence staining or for digital pathology.
TMAs have been a massive aid to the medical field. Two important areas include the cancer research and drug discovery. In oncology, TMAs are used in generating diagnostic tests and in investigating cancer biomarkers. In drug discovery TMAs are often used to assess early drug targets, including assessing gene expression in a diseased tissue, screening and validation of potential drug targets and can be an important tool in quality control.
Using the automated TMA GrandMaster, the Histology Platform can help design and generate TMAs to suit your specifications. For more information on the specifics of the TMA GrandMaster, please check the Instrument section.
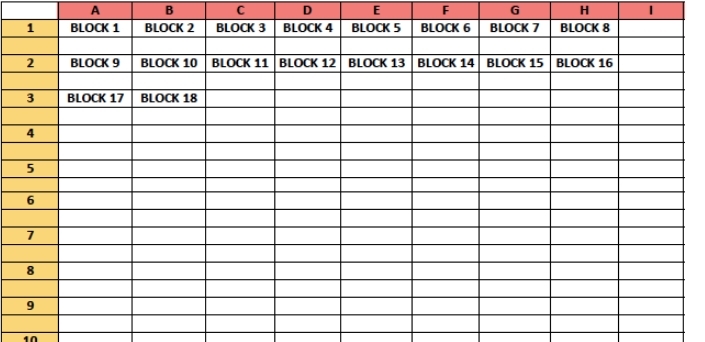
Building a TMA
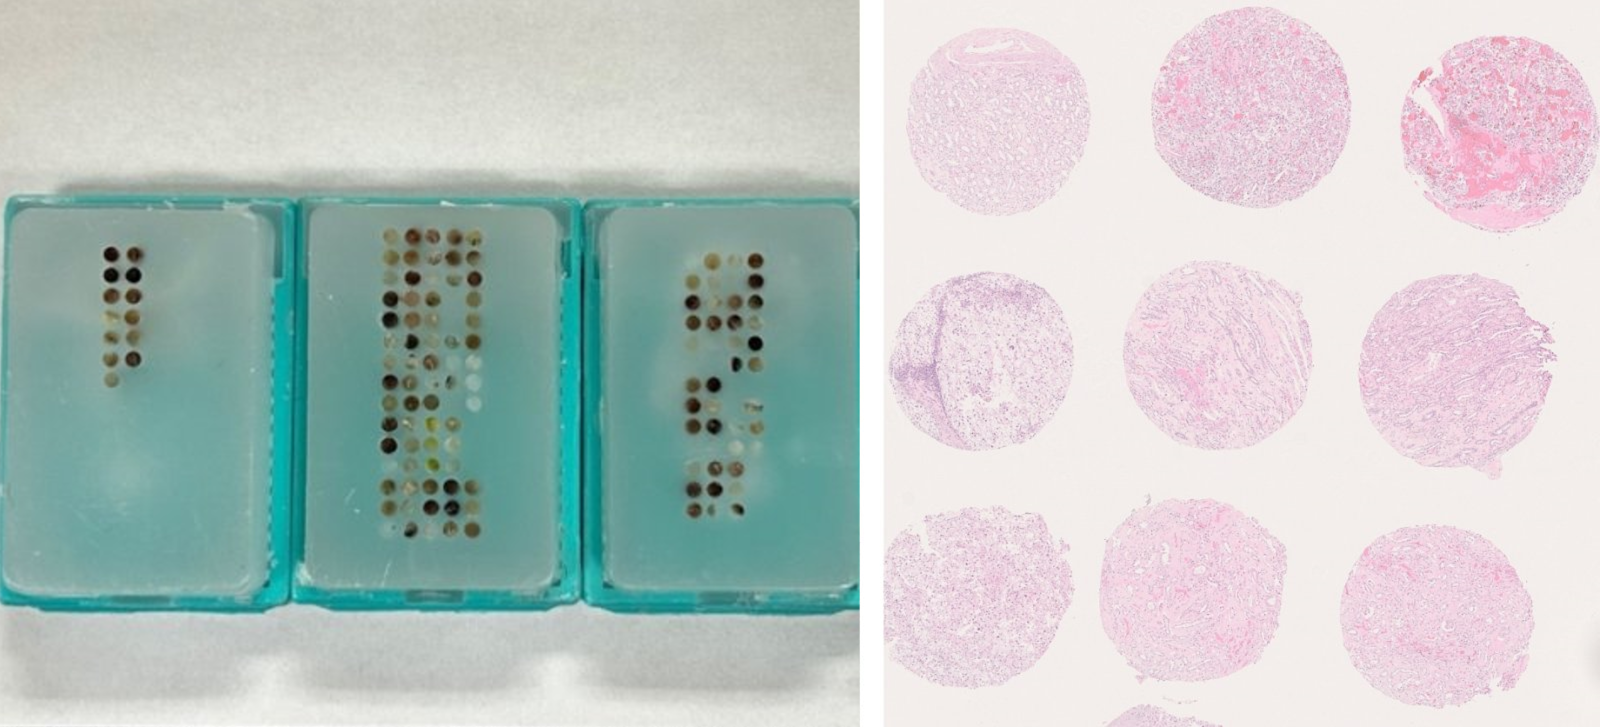
To build a TMA, a TMA map must first be created. The TMA map contains all the block ID’s that match where each block’s core will be placed in the TMA recipient block. We recommend the TMA map is not symmetrical, this will help in ensuring the TMA and the TMA map are easily matched, and orientation is never mistaken. Please see below for an example TMA map.
Once the TMA is generated the blocks can be loaded into the TMA Grandmaster, with the recipient block. Our technicians will prep the machine and ensure that each block image is labeled and select the appropriate area of tissue to take the core from. The machine will punch the cores and move them to the recipient block according to the TMA map. Once all cores are in the recipient blocks, our technicians will carefully soften the paraffin of the recipient block allowing the cores to adhere to the paraffin and prevent core from falling out. TMAs are then safe to be sectioned for further analysis.
We recommend that TMAs are handled with care. Wrapping the TMA in a Kim-wipe or tissue and storing it in a safe place is advised.
Digital Pathology, Slide Scanning
Digital pathology is the process of acquiring, managing, sharing, and interpreting pathological information. To support these goals the Core is equipped with a high throughput brightfield scanner, allowing acquisition of high-resolution slides, that can be easily stored and saved for future use, analysis, use in digital programs, and sent across the globe to collaborators.
The Nanozoomer S210 is a newly acquired brightfield scanner. The scanner can take high resolution images of slides stained with H&E, IHC or specialty stains. Two objectives can be used, either 20x or 40x to capture the images. The scanner holds 210 slides simultaneous for efficient and reliable scanning.
The Nanozoomer has unique Z-stacking capabilities which can be used if acquiring images of thicker specimens.
Once the image is generated, they can be taken by users using an external hard drive or shared remotely via Microsoft SharePoint.
Digital slides can be opened through two different free viewers, links to download each program are found below.
NDP.View2 (compatible with both Mac and PC):
https://www.hamamatsu.com/eu/en/product/life-science-and-medical-systems/digital-slide-scanner/U12388-01.html
ImageScope (compatible with PC):
https://www.leicabiosystems.com/en-ca/digital-pathology/manage/aperio-imagescope/
For analysis of your slides, the free open-source tool, QPath, is recommended. QPath allows for whole slide analysis with features including but not limited to, algorithms for tissue and cell detection, annotation capabilities, and supports brightfield and fluorescence images.
https://qupath.github.io
Training
Whether you are looking to develop new skills or enhance your current technique our technicians are there to help.
Training services will be hands-on and held in small sessions of groups no larger than three. All tools and equipment will be provided for the training, as well as specimens to practice on. If you are working with a particular tissue type or have samples you want to practice on during a training session, you are free to bring them.
Trainings sessions generally follow this structure:
Introduction to the lab, where equipment is located and important first aid locations. Followed by an introduction to the machine, highlighting the safety features and rules regarding the machine. Technicians will then demonstrate how the machine is used, going over in detail what is being done. Trainees will then attempt to use the equipment with support from Core technicians who will provide tips and suggestions. Once the trainee gains confidence Core technicians will continue to observe to ensure the trainee is able to safely operate the machine on their own.
Once the training is over, trainees will be able to book the equipment and use it on their own. Technicians will be at the Core to answer questions or provide additional support if needed.
To access any equipment within the Histology Platform, all users need to be trained by a Histology Core Technician, this ensures the safety of the user and the protection of the equipment.
The Histology Platform has a diverse array of equipment, some is for staff use only, while other pieces of equipment are open for booking by trained users.
Staff use only
Tissue Tek VIP5 Vacuum Infiltration Processor:
An automatic, self-contained tissue processor, which holds up to 300 cassettes. The VIP software is programmable for up to 20 different programs for use in the fixation, dehydration, clearing and paraffin of a variety of specimens. We can customize programs to the specific needs of our clients.
Leica EG 1150H Embedding Center:
The Leica EG1150 modular tissue embedding center incorporates two separate components, the independent modules offer the flexibility to arrange embedding workflow for maximum efficiency. Tissues are oriented in a metal mold filled with hot paraffin.
Leica ST5020 Multistainer, Automatic Slide Stainer and Coverslipper:
The automatic Stainer produces consistent, high-quality results for both routine and special stains and can perform single or multiple protocols at the same time. Note, some specialty stains are performed manually.
Microtomes:
The Core has three microtomes for staff use. 1) Leica RM2255 automatic microtome 2) Fisher Microm HM340 semi-automatic microtome 3) Fisher Shandon Finesse ME automatic microtome.
Cryostat:
The Core has one cryostat for staff use. Fishers Cryostat Microm HM 525 features UV disinfection and maintains temperatures between -15 degrees Celsius and -35 degrees Celsius.
Ventana Discovery Ultra:
The Core is equipped with a Roche Ventana Discovery Ultra, and automated IHC staining system. The Ventana has 30 individual and independent slide drawers, each allowing different experiments to occur in parallel. Both fully automated and semi-automated protocols can be developed within the Ventana to suit your needs.
The Ventana Discovery Ultra is only available for independent use by users at the GCI. All users must be trained by a Histology Platform Technician before they are able to use and book this machine. All non-GCI members are required to fill out a service request.
Features:
- Steps that can occur within the machine: baking, deparaffinization, cell conditioning, staining, counter staining, and titration.
- 35 reagent position and 30 individual and independent slide drawers.
- Enhanced temperature control.
TMA Grand Master:
The TMA Grandmaster is a fully automated Tissue Microarrayer, able to generate TMA paraffin blocks. Please see below for machine specifics.
Block Capacity within Machine:
Highest capacity: 72 blocks; 60 donor blocks and 12 recipient blocks can be loaded at once. If more blocks are needed for the TMA, the blocks with be exchanged after the first set of punches is collected.
Core Diameters
- 0.6 mm- maximum of 558 cores
- 1 mm- maximum of 286 cores
- 1.5 mm- maximum of 135 cores
- 2 mm- maximum of 84 cores
Fast microarrayer
- 2 mm max. 84 cores
- max. 12 seconds per core
- Simultaneous loading, imaging, drilling, and punching.
Smart automation
Features automatic block height measurements to ensure the embedded cores are aliged with the recipient block surface, allowing all cores to be exposed during sectioning, without wasting valuable tissue.
In addition, the machine is capable of automatic barcode reading, donor block and label image saving for reference, project data saving into Excel file and Automatic PCR extraction.
PCR Extraction
Extracted FFPE tissue samples are ready for DNA extraction and PCR analysis with commercially available kits. A clean block is used for this process to avoid cross contamination.
Either 6 PCR cassettes or 10 PCR tubes/cassettes can be used.
Hamamatsu Nanozoomer S210:
The Nanozoomer S210 is a high throughput digital slide scanner. The S210 can quickly scan tissues and cells into high quality digital images perfect for publication, analysis, or collaboration.
Features:
- Batch scanning: can scan up to 210 in one batch.
- Has both 20x and 40x objectives
- Performs fully automatic scanning.
- Brightfield scanners: can image routine H&E slides, slides stained with a specialty stain or IHC slides.
- Z-stack feature allows scanning of thick sections.
- Free image viewing software, that works on both Mac and PC.
- Image Management: slides can be downloaded remotely from SharePoint or can be downloaded onto an external hard drive.
Equipment available for use
Microtome and Cryostat:
The Core has a cryostat and a manual microtome station, including the microtome, a water bath, and an additional light, which are available for booking.
All users of the equipment must first be trained by Histology Platform Staff before being able to book or use the instruments.
To keep the equipment in good working order the following protocols must be followed:
- The equipment must be booked online.
- Before using the equipment, please sign into the logbook to keep track of usage, and note any errors or problems that arise.
- Users are required to bring their own tools to use the equipment (such as blades, slides or OCT).
- All equipment must be kept clean.
- Cryostat: Thoroughly clean the cryostat with 100% after use, including the mounts.
- Microtome: Must be cleaned after use, and the water bath emptied. Please turn off all pieces of equipment.
- Rummaging around Core drawers and taking core supplies without permission is not allowed. We are unable to quantify levels of our consumables if they are being taken without our knowledge or consent.
- If any issues should arise while using the equipment, please let Core staff know as soon as possible.
Ventana Discovery Ultra and Nanozoomer S210:
The Ventana Discovery Ultra is open for use and booking by GCI members, please contact the Core for more information or to set up a training session.
The NanoZoomer S210 is currently for staff use only. In the future the Nanozoomer will be opened for GCI lab use, with labs able to select an individual to be the designated user for the lab.[NR1]
[NR1]Depends on when launching- will launch with infinity- no clue when that is
How you submit your samples depends on what samples are being submitted. All samples must be submitted through the completion of histology request, which can be made on the Infinity Platform.
Paraffin Samples
All paraffin samples need to be fixed by the labs before they are dropped off with the Histology Platform. See FAQ section for fixation protocols.
All paraffin samples, whether they are in solution pre-processing, already embedded or sectioned, can be dropped off in the basket outside the Core labeled ‘Histology Drop Off’. All samples must be brought in with a printed copy of the request form generated from Infinity.
All cassettes being dropped off at the Core should be labeled in pencil, solvent resistant markers or have been printed with a cassette printer.
If slides are being dropped off for staining, ensure that a sharpie is not used for labelling, as the staining process will remove the label. We recommend a pencil or an solvent-resistant marker.
If slides are being dropped off for scanning, please ensure they are completely dry and clean (no excess mounting media or broken glass).
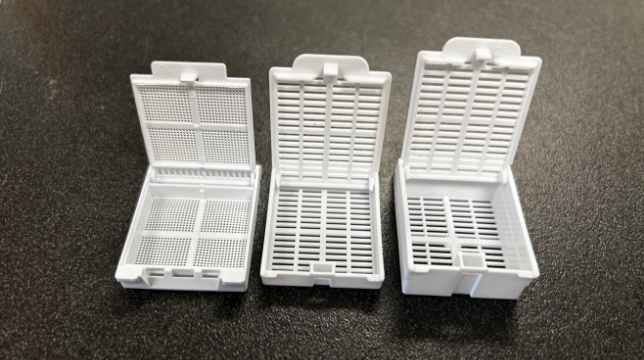
Cassette Size: There are different sizes and types of cassettes one can use for samples, what is needed will depend on the size of your samples.
- Mesh Cassettes: The openings in the cassette are mesh, making this the best option for small samples, such as salivary gland. If you have very small samples, it is advised they are wrapped in a lens paper before placing into the cassette, to ensure it does not fall out.
- Standard Cassettes: Good for most samples. Can be used for small samples if wrapped in lens paper if mesh cassettes are not available.
- Mega Cassette: Used in very large samples, or samples that are long and mush be embedded vertically. This could include whole rate femur or colon.
Frozen Samples
All frozen requests require an appointment to be made with the Histology Core. Contact the Core at: histology.gcrc@mcgill.ca
On the day of your appointment, you will bring in your samples either on dry ice (fresh-frozen or already embedded in OCT) or at 4 degrees Celsius (if fixed and cryoprotected) to the Core with a copy of your request form. Technicians will indicate the length of time expected to complete your order so you can arrange pick-up. Samples will be stored short term at -20 or -80 if same day pick-up is not an option.
The Histology Innovation Platform, and all Platforms located at the Goodman Cancer Institute ask that you acknowledge the Core in your publications and presentations.
Acknowledging the Platform is Important
- Our clinicians and technicians offer valuable intellectual and experimental contributions to your research and deserve to be acknowledged for their time and effort.
- Our Platform requires proper acknowledgements in publications as a valuable metric. Acknowledgements are the most important way we can demonstrate our value and are extremely useful when submitting grants or requesting funding from various funding bodies to support the cost of services, or new equipment, which helps us gain financial support to maintain our operations. Without this support we may not be able to continue to operate or provide essential services to the research community.
How to Acknowledge the Platform:
- When: The Platform should be acknowledged any time a Platform is used by your lab.
- Where: Acknowledgements can be added to papers, publications, posters, grants, or reports
- How: Here are some examples of how the Core can be acknowledged in your research:
- Within the Acknowledgements section: The authors are grateful for support from the Histology Innovation Platform (Technicians names) at the Rosalind and Morris Goodman Cancer Institute.
- Within the Acknowledgements section: Histological Experiments were performed by the Histology Innovation Platform (Technicians names) at the Rosalind and Morris Goodman Cancer Institute
- Within the Methods Section: Experiment was performed by the Histology Innovation Platform at the Rosalind and Morris Goodman Cancer Institute
- If there was a new stain or method developed by the Core for your research than technicians working on the project must be given co-authorship on your publications.
Please send us a PDF copy of each publication where the Histology Platform is acknowledged. This helps us to apply for funding to continue supporting researchers. Publications can be sent to the histology.gcrc@mcgill.ca email address
Protocols
Protocols will be added shortly.
Paraffin vs. Frozen Specimens
Paraffin embedded samples are the most stable samples and offer better preservation of tissue morphology and architecture with less injury to the tissue. Paraffin samples are more cost efficient and perform well with many different staining techniques including IHC.
Paraffin samples do have drawbacks including certain stains do not perform optimally with paraffin samples, DNA and RNA degradation can occur, and it is hard to extract nucleic acids for further downstream experiments.
There are two different types of frozen specimens: fresh frozen and cryoprotected tissue. Both frozen tissues will have increased lipid retention and improved preservations of enzymes and antigens. Often frozen sections are thicker than paraffin sections which can decrease the microscopic resolution and make it harder to study the tissue morphology.
Fresh frozen samples preserve the native biological state, thus you have more flexibility for downstream experiments, such as IHC with biomolecules that degrade when fixed. However, drawbacks include the continuous storage of samples at -80 degrees and lack of long-term preservation, gradual tissue degradation, the need for fast processing and sectioning.
Cryoprotected frozen, is first fixed and cryoprotected before being frozen. These steps aid in the tissues long term preservation, which is better for long term analysis of samples. Drawbacks can include the lack of cellular viability, long term storage at -80, and potential artifacts and alternations to the tissues.
For IHC experiments, what will the Platform need?
For IHC experiments you will need to fill out a request, and bring down either the blocks to be sectioned or slides to perform the experiment on.
You will also need to bring down the primary antibody for the Core to use. In most cases we will not have the antibody on hand. If you want to check with staff if your antibody is in stock, please send us an email.
If you are performing a duplex or triplex stain, you may need to bring down further reagents. Please contact us for more information.
When choosing a primary antibody for IHC, what do I look for?
Look for a primary antibody, choose one that either has anti-rabbit or anti-mouse as a secondary antibody.
Ensure the antibody has reactivity with your species of interest. This can be found on the antibodies data sheet.
You may choose a polyclonal or monoclonal antibody. Monoclonal antibodies are specific to a single epitope and will be able to detect a single protein with high affinity. A Polyclonal antibody will recognize multiple epitopes and is better suited for heterogenous populations.
Ideally choose an antibody that has already been tested and approved effective in IHC staining, this information can be found on the antibody manufacturer’s data sheet. In many cases you can see other publications that have been published using these antibodies, if deciding between antibodies, one can reference these publications to see if they have been used on your specific tissue or species.
What is a STEP Section?
STEP Sectioning is when a there is a space between sections collected. For example, if you desire a step of 100 microns, one sections will be taken and then the tissue will be trimmed, until a second section 100 microns away from the original section can be taken.
STEP section allows one to have sections from different areas within the same tissue.
What is the best way to ship samples to the Platform?
If samples are being shipped to the Histology Platform a date needs to be selected with the Core where your lab would arrange a courier service to pick up your samples and bring them to the Core. We will provide a detailed address and our lab phone number/ contact person so that we can receive the samples. The Core is open 9-4 on weekdays. Once the work is finished, your lab will send us a shipping label, and coordinate with the company to come and pick up the samples.
Please ensure that if your samples are frozen, that adequate measures are taken to ensure they remain frozen on the duration of their journey. Also ensure that all samples that have yet be processed or embedded (both FFPE and cryoprotected samples) are in enough solution to avoid dehydration.
Do we get to the keep the slide boxes or folders?
The Histology Platforms slide boxes need to be returned after collecting your slides or returned when dropping off your next set of samples. Boxes given out to labs are tracked by Core staff and marked when returned. Quarterly labs will be reminded of the missing slide boxes, and if not returned the labs will be charged.
You can bring down slide boxes for us to use with your order to simplify slide collection once the order is complete.
If you do not have slide boxes in your lab, you are able to request to buy ours as part of your order.
For IHC, do I need to provide control tissue?
We have tissue that can be used for controls in your IHC experiments performed at the Core. The Core has mouse, rat, and human control tissues, if you require a control tissue from another species, you will need to bring this to the Core for your IHC. Additionally, if a diseased state control is needed for your experiment, you will also need to provide this.
How do I know when my samples are ready?
When your samples are ready to be collected you will receive an email notification from the Core. You will be able to collect your samples from the pickup box, on the table outside the Core’s main entrance.
If you are picking up frozen samples, please come within the Cores working hours, as we will store samples in the freezer until they are picked up.
Additionally, if your slides were scan and you wish to download a copy onto a USB or external hard drive, please come during working hours so we can provide you with the necessary support.
How do you properly fix or prepare specimens?
Proper methods of fixation or sample preparation will depend on the type of sectioning being done. All fixation needs to be done quickly after euthanasia and dissection. Fixation allows for the preservation of the native structures of your tissues and is very important for the quality of the sections.
Paraffin: Fixation
Generally, tissues should be dissected into pieces that are between 3-5 mm thick. If larger tissues need to remain intact your fixation time may be longer. If working with small tissues, and cassetting yourself, ensure the samples are wrapped in lens paper to avoid the tissue falling out of the cassette.
To fix:
- After dissection, rinse tissue with PBS to remove blood or debris.
- Place tissue in fixative solution. The volume of fixative should be at least 15x to 20x greater than the volume of tissue.
- The most common fixative is 10% Neutral Buffered Formal (NFB).
- Samples are refrigerated at 4 degrees Celsius.
- Samples are left in fixative for approximately 24-48 hours, and usually no longer than 72 hours (if using NFB)
- This length of time may very if you have a very large tissue or are using a weaker/ stronger fixative.
- Samples are transfer into 70% Ethanol in a sealed container.
- Samples are ready to be brought to the Histology Platform- make sure to bring down a copy of the request form and label the sample container with the request number.
Frozen: Fixation and Cryoprotection
In cold conditions:
- Wash the tissue in cool PBS, after dissection.
- Fix in 10% NBF or 4% paraformaldehyde (can be done in Eppendorf or dish make sure volume of solution is about 20 times the volume of the tissue) Leave at 4 degrees for ~48 hours.
- Wash with cold PBS
- Place tissue in 15% Sucrose- PBS solution, 4 degrees, until the tissue sinks (usually overnight)
- Place tissue in 30% Sucrose PBS solution, 4 degrees, until it sinks (usually overnight)
- Send to Histology Platform on Ice, or ice packs in the Eppendorf tubes.
We will then be able to complete the OCT embedding and sectioning.
Frozen: Fresh Frozen
The tissue needs to be frozen very quickly, however directly submerging the tissue into liquid nitrogen can cause cracks which will affect the quality of your sections.
There are a few methods to fresh freezing.
Dry Ice:
- Place tissues into a tube or small container within a Styrofoam box with dry ice. This method may not be as quick or efficient at freezing.
Submersion
- Add dry ice into the bottom of a Styrofoam container and place a small disposable container or stainless-steel bowl onto the dry ice.
- Add some small dry ice pellets into the bowl.
- Pour isopentane/2-methylbutane into the bowl. The dry ice pellets and isopentane/2-methylbutane mixture will vigorously bubble.
- Once bubbling has stopped, place the tissue into the solution until it is completely frozen.
- Transfer the tissue into a container that has been pre-chilled on dry ice.
- Store the tissue in -80 or in liquid nitrogen.
For either method of fresh freezing, the samples must be brought down to core in dry ice to ensure integrity.
Specimen Orientation
At the Core our standard method is to embed so the largest surface area will be exposed when cutting. If you desire a specific orientation, or area of tissue to be exposed please write this in the note section of the request form, and you can attach an image to the request or an Excel file to give us a guide.
Section Thickness
Section thickness will depend on the downstream experiments being performed on samples and which instrument is being used.
For paraffin sections, 4 microns is the most common thickness, but section thickness can range from 2-10 microns.
For frozen sections, thickness usually ranges from 4-15 microns.
What objective do I choose for bright-field scanning?
There are two objectives you can choose from when scanning slides, either 20x or 40x.
20x is the most commonly used objective. These images allow one to see cellular features and structures. Additionally, the file sizes are still relatively small, making data management easier.
40x is used to give more detailed images. This can be important when looking at nuclear structures or even small bacteria within samples. 40x scanning produces large files, which if scanning many slides can make storing the data more complicated.
I need my samples ASAP, what do I do?
If you need your specimens done quickly for a tight deadline, you may select the RUSH option on the request. This prioritizes your submission and moves it to the front of the line. RUSH samples are guaranteed within 2 weeks- and are usually completed in under a week.
To note the RUSH option comes with an extra charge. RUSH requests add an additional 50% of the final order total onto the cost. If the request total cost is $10, the RUSH charge will be $5.
If I have used histology equipment before, do I still need training?
Yes. You still need training by a Histology Core staff member even if you have had experience with this type of equipment in the past. The training allows staff to ensure that you can use the equipment in a safe manner. Our priority is your safety and the maintenance of our equipment.
Office 514-398-5647
Lab 514-398-8270
Location:
Rosalind & Morris Goodman Cancer Institute / Institut du cancer Rosalind & Morris Goodman
McGill University
1160 Av. des Pins W - Room 312
Montreal, Qc , H3G 1Y6
The easiest way to find our lab is to enter through the main entrance of the Bellini Building (3649 Promenade Sir William Osler). Take the elevator up to the 3rd floor and turn right, walk past the kitchen and you should see the Platform on the right. The drop off table for your samples is in front of the door. If you need to speak to one of our technicians, please come into the lab. Please note it is exceptionally hard to hear someone knocking on the door from the main part of our lab.
Get in touch
We'd love to hear from you
Rosalind & Morris Goodman Cancer Institute all rights reserved • Privacy policy • Accessibility
Website by Riposte